Ultimate HTV Beginner's Guide - Part II: Creating and Cutting the Design
![]()
Welcome to Part II of Rozzy Crafts’ Ultimate HTV Beginner’s Guide!
In Part I: The Supplies, we walked through all the supplies you need to start creating beautiful heat transfer vinyl projects. If you haven’t already read Part I, we highly recommend starting there. After all, the last thing you want is to realize you’re missing something halfway through your awesome HTV project!
Got all your supplies? GREAT! Now on to Part II: Creating and Cutting the Design!!
In this post, we’re going to design, cut, and weed the heat transfer vinyl for this simple t-shirt project. (Part III will be about applying this HTV design to the t-shirt using a home iron.)

We’re going to be using Silhouette Studio to make this design. If you don’t already have it, you can download version 4 of Silhouette Studio here. Silhouette Studio is the software that comes with the Silhouette cutting machines—Cameo, Portrait, and Curio. Although we’re using Silhouette Studio in this example, the same ideas apply to Cricut’s design program—Design Space®. So, even if you decided to buy a Cricut Explore Air™ instead of a Silhouette Cameo, READ ON!—you’ll still get a lot out of this post.
Let’s go ahead and open up Silhouette Studio. As you can see below, we’re using version 4 in this demonstration.
The first thing you'll want to do to get started making your design is adjust the settings of your project to match the heat transfer vinyl sheet you’re using. Do this by going to the “Page Setup” panel, which you can access by clicking "Panels" on the top-left of the screen and then “Page Setup…”.
In this project we’re using a sheet of Rozzy Crafts’ red glitter HTV, which is currently available in our 18-sheet glitter starter pack (and will be available individually in a few weeks).
Every sheet of HTV from Rozzy Crafts comes in the dimensions of 10 inches by 12 inches, so we’re going to adjust our page in Silhouette Studio to match those dimensions. We’re also going to set the page to the “landscape” orientation because we want to make our text as big and long as possible! Besides these adjustments to the page, we’re going to apply the “Cutting Mat” visualization option. We’re going to be using a cutting mat when cutting the vinyl, so selecting this option will help us know where we should be placing the HTV sheet on the mat. (For a full explanation of cutting mats, see our blog post: How to Use a Cutting Mat with Heat Transfer Vinyl.) In the “Cutting Mat” drop down, we choose “CAMEO 12 x 12 in” because that’s the cutting mat we have and will be using. Finally, we’re going to click the button for “Show Cut Border” in order to display a red boundary line that we must keep our design inside of—anything outside that red line will not be cut correctly.
Take a look below as we configure these four settings described above:
Now that we’ve setup our page for our project, let’s get started with some text. Choose the text tool by clicking the “A” on the left-side toolbar, then click anywhere on the page to open a text-edit field. Type the words “but first” and then click somewhere else on the page to close the text-edit field. Now click on one of the letters of "but first" in order to select that text box. Now choose the font you want to use (we’re using “Miss Elizabeth” for this text) and then choose a font size that makes the text take up most of the page (we’re using 425 point size but that number will really depend on the font you choose). Position the text on the top half of the page. Finally, center the text on the page by going to the “Object” menu on the top-left, choosing “Align,” and then choosing “Align Center.” Now follow this whole procedure again in order to create a second text box that says “coffee”. We like using a different and more serious font for this incredibly serious matter! (We’re using Century Gothic.) Here’s a demonstration:
One of the most important things to remember when creating designs for HTV projects is that the side of the sheet of HTV that we cut will face/touch the surface of the underlying material (e.g., the t-shirt). As a result, in order for a design to be readable to someone looking at a t-shirt, you have to cut your design in reverse. In order to accomplish this, we first make our design the regular way (as you just did by writing text that you can read on the screen), but then you must flip that design horizontally—an effect that is called “Mirroring” in Silhouette Studio. In the clip below, see how we mirror the text by selecting it, choosing the menu “Object,” then clicking “Mirror,” and “Flip Horizontally.”
Here's another issue we have to overcome: Notice how these letter in the “but first” text overlap one another. If we were to send this design to the cutting machine in this state, these overlaps would result in whole chunks being cut out of the text. It'd ruin our design!
Luckily, there’s a simple solution to this problem—it’s called Weld. All it does is take designs that overlap and turns them into a single object. When that happens, only the outside lines of the new whole object will be cut. Problem solved! The Weld function is found under the menu “Object,” then “Modify,” and then “Weld.” Take a look below and notice at the end how the text has become one continuous unit.
Our design is now complete! Which means it’s time to send it to the cutting machine—but not before we setup the vinyl for cutting, that is.
Go ahead and get out your sheet of HTV and your cutting mat. Once again, we’re using a sheet of red glitter HTV currently available in our 18-sheet glitter starter pack, and we’re also using the 12 inch by 12 inch cutting mat by Silhouette. Place your sheet of HTV on the cutting mat with its cut-side up. (Confused on which side goes up? See our post: Surefire Way to Know Which Side of Your Heat Transfer Vinyl to Cut.) If you’re using a 12-inch by 10-inch sheet like we are, make sure the long dimension runs left to right (i.e., portrait orientation), and place the sheet along the edges closest to the arrow, like this:

In other words, place the sheet on the cutting mat just like you see it shown on the Silhouette Studio screen.
The next thing we want to do is set the blade in the Silhouette to the correct depth. What’s the correct depth, you ask? Great question! Let’s ask Silhouette!
Go ahead and click “Send” in the top-right corner (don’t worry, it won’t immediately send the design to the machine). Choose the correct material type; here, “Heat Transfer, Glitter,” and click “Next” and then click “Next” again. Now Silhouette Studio tells you that for glitter HTV you should set your blade to “3”.
Now open up the lid on your cutting machine and remove the blade by twisting the knob to the left and pulling up on the black cylindrical blade unit. The blade in this example is initially set to “5,” which you can see by looking at the location of the red line.
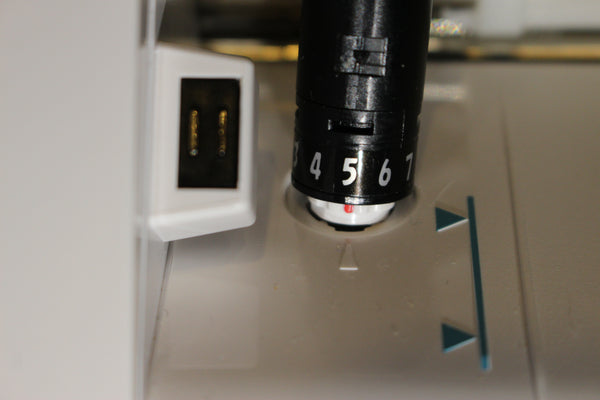
To reset this blade to “3,” first place it blade-down into the hole on the left side of the machine's inside. Make sure to line up the red line with the arrow on the cutting machine.
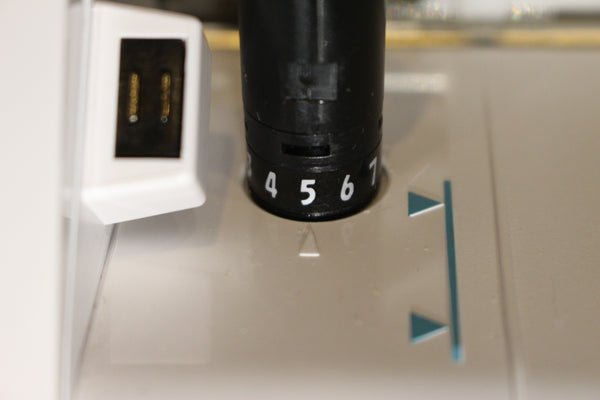
Next, rotate the blade (while still in the hole) until the “3” on the blade lines up with the arrow on the surface of the cutting machine.

Now that your blade is set to the correct setting, place it back in the blade holder, push it down all the way, and tighten the holder by twisting the knob to the right.
Lineup the cutting mat and HTV with the cutting machine with the black arrow at the top of the cutting mat pointing into the machine.

Make sure the white plastic rollers on the machine are set to line up with the outer portions of the cutting mat. You can adjust the position of the white rollers by rotating them on the metal bar so that they get out of their grooves, sliding the white rollers to the next set of grooves, and rotating the white rollers into the new set of grooves. (There are additional instructions on how to do this under the lid of your Silhouette cutting machine.)
With the cutting mat pressed up against the metal bar in the cutting machine, press "Load cut mat" on the machine's display screen.

Once the mat is loaded, return to your Silhouette Studio screen and hit the final "Send" button in the bottom-right to send the design to the machine for cutting.
Your machine should now be whirling with activity! Your awesome design is coming to life!
After a couple minutes your design should be cut. It can be hard to see, but look at the HTV in direct light and the cut lines should be visible.
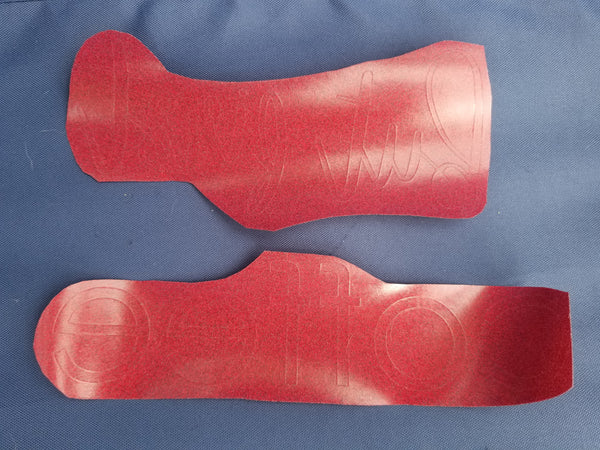
The last thing we'll cover in this Part II of the series is weeding the HTV. "Weeding" is the process of peeling away the parts of the heat transfer vinyl sheet that do not make up your design. Let's begin by getting out a pair of scissors. Weeding is easier when you have less empty space around your design, so use a pair of scissors to cut around your design. Here, we're going to cut closely around "but first" and we're going to do the same with "coffee," which means we'll end up with two separate pieces. BE VERY CAREFUL not to cut any part of your design!
Get out your weeding tool. Begin by picking the material out of the inside of the letters that have enclosed interiors (like "o" and "e"). You'll find it easier to remove this interior material if you dig the weeding tool into the HTV close to a cut line. But don't dig directly into the cut line or you'll risk damaging the HTV that makes up your design.
Once you've removed all the interior material, dig in the weeding tool somewhere on the outer edge of the HTV piece and start slowly peeling away the background HTV. Work your way around the outer edge until you've lifted it all up, and then start to pull across the letters. The key is to go slowly and smoothly. Use your hands to peel when you can get a good grip, and use the weeding tool when you can't or need to start a new section. Use the weeding tool to extract inner sections like in the top parts of the "f"s. As you go along, make sure you're not accidentally peeling up any of the designed HTV, especially when you're peeling around the small dot over the "i". As you can see in the video below, you may need to use the weeding tool to press down on the dot as you pull the background away.
And that's it! We've successfully made a design, cut the design, and weeded the design!
Now we're ready to apply the design to our t-shirt. So keep reading because that's the subject of Part III of our Ultimate HTV Beginner's Guide!
Leave a comment