How to Use a Heat Press with Heat Transfer Vinyl (HTV)
Today we'll be putting the HEAT in heat transfer vinyl. Many crafters start out experimenting with HTV by using their home iron and there's absolutely nothing wrong with that. A correctly-temperatured flat iron can do the trick when it comes to adhering the vinyl. But for those of us who want to take the process to the next level, ensuring the vinyl is applied evenly and thoroughly, there is the heat press.
Heat Presses
There are many different makes and models of heat presses. They can run anywhere from around $140 to well over a $1,000. But all of these machines have pretty much the same primary function--applying a set amount of heat and pressure in a downward direction.
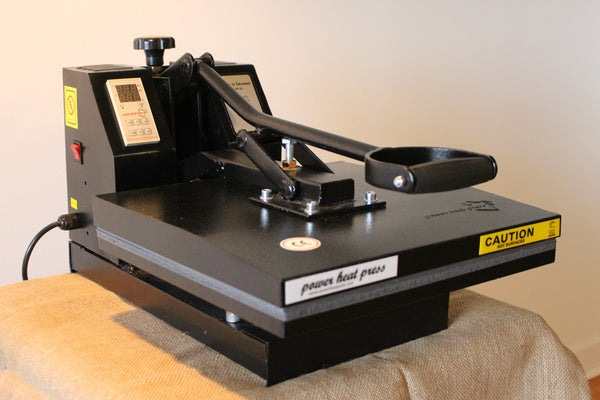
In this post, we'll be using the PowerPress Industrial-Quality Digital 15-by-15-Inch Sublimation T-Shirt Heat Press, Black.
This press is one of the most popular on Amazon and currently has a 4.3 star rating over 572 customer reviews. And at about $210, it's on the less expensive end of the scale (but certainly not a cheap investment for any crafter).
Today's Project
We'll be undertaking a pretty straightforward t-shirt project in order to show how the heat press works:

My nephew has a school spelling be coming up and he's really been practicing a lot, so I wanted to have this t-shirt ready for him just in case!
I'm using Rozzy Crafts Sky Blue heat transfer vinyl:

First, Find a Good Work Space
When using a heat press, the first thing you'll have to do is find a good working space. You want to make sure you position the press on a sturdy surface. The press is pretty heavy at about 55 lbs, plus you'll be applying additional downward pressure, so you need to make sure you're using a table or other surface that can handle the load. Along the same lines, as you can probably imagine, the heat press gets HOT. You therefore want to make sure you don't have any materials too close to the work space that might melt or catch on fire.
Second, Set the Right Amount of Pressure
Once you have the heat press located in a good spot, go ahead and plug it in but don't turn it on yet. In order to get the best results, we need to make sure the press applies the right amount of pressure. Too little pressure and the HTV will not properly attach to the underlying material. Too much pressure and you could end up burning your material.
You adjust the pressure by twisting the knob located on top of the machine. Remember: Righty tighty (more pressure), lefty loosey (less pressure)!

A good method for finding the correct pressure is to start very loose and then work your way tighter. With the knob very loose (i.e., turned far to the left), close the heat press by pushing down on the handle and then keep pushing down on the handle until the apparatus actually locks closed. Now open the press back up, turn the knob tighter by 4 or 5 turns, and try locking it closed again. Keep doing this process until the knob is turned so tight that you can't lock the heat press closed. Once you've turned the knob so that it's that tight, turn it a couple twists looser. Your goal is to turn the knob so that the press has as much pressure as it can while still being able to be locked closed.
Third, Bring the Heat
Now that your machine is plugged in and set to the correct amount of pressure, go ahead and turn it on at the ON/OFF switch.

Now let's go ahead and get the machine warmed up to the right temperature. Like all of Rozzy Craft's PU heat transfer vinyl, the correct temperature is somewhere between 300 and 320 degrees Fahrenheit, so we'll split the difference and set it to 310. On this particular machine--as well as on most machines--we set the desired temperature by pressing the "Up" or "Down" arrows near the display until the desired temperature is shown.

While the machine is heating up, but before it's at the final temperature, I like to throw the t-shirt in for a pre-press to get rid of any wrinkles and to create a nice flat space where we'll be placing the vinyl.


Fourth, Place Your HTV
With a nice clean canvas, it's now time to place your heat transfer vinyl on the garment for pressing. You have two basic options. First, you can place the HTV on the t-shirt while the t-shirt is on the heat press.

The upside to this method is that the HTV won't move from where precisely you place it. You just lower the heat press lid and--VOILA!--the HTV has adhered exactly where you placed it.
The downside to this is method is that, first of all, you can burn your hands--BE CAREFUL! Second, if you're using a t-shirt or other substrate (that is, the thing you're placing the HTV on) that's bigger than the area of the heat press, you may not be able to tell where exactly you're placing the HTV in relation to the rest of the t-shirt. Are you placing it too close to the collar? Off to the left? Not parallel to the bottom? These issues don't arise when you can see the entire outline of your substrate and can therefore be confident about where you're placing the HTV.
The second method is to place your t-shirt on a surface other than the heat press (like the floor), place the HTV on the substrate, and then transfer the whole assembly onto the heat press.


If you choose to use this method while also using the Rozzy Crafts HTV, the adhesive material on the HTV will automatically keep the HTV in place on the shirt as you move it from the surface to the heat press.
Fifth, Protect Your Heat Press
Once you have the HTV in place on the substrate, and the t-shirt in place on heat press, we recommend covering the HTV with a teflon sheet. This protects the top panel of the heat press from having HTV stick to it. If that happens, the residual HTV can inadvertently be transferred to your next project.
There are two methods for using the teflon sheet. First, you can just lay it over the HTV and substrate.


The second method is to attach the teflon sheet to the top plate itself by, for example, using magnets.


Attaching the teflon sheet to the heat press like this is especially useful if you're going to be pressing a lot of t-shirts. That way, you don't have to keep putting it on, taking it off, placing it to the side, grabbing it again, putting it back in place, taking it off, and on and on and on.
Finally, Apply the Heat!
With the substrate, HTV, and teflon sheet all in place, and with the machine having reached the correct temperature, the last step of the process is to lower and lock the lid for the proper amount of time. Most heat presses have a timer that you can use to make sure the heat is applied for the exact right amount of time. Just press the "Up" or "Down" arrow until it shows the number of seconds you want.
![]()
With the correct number of seconds on the clock (for Rozzy Crafts PU HTV it's 8 to 10 seconds), go ahead and push the heat press handle all the way down. Make sure to keep firmly pressing downward until the arm itself locks into place. Once the press is in the closed position, the clock will start to run. Once the time expires, go ahead and open the press back up. If you're using Rozzy Crafts HTV, be sure to let the material cool before you peel! But once you do peel, you will have a beautiful and evenly applied new design!

One Last Parting Tip
After I've peeled the plastic off, and while the machine is cooling down, I like to do one quick additional press straight onto the material for about 2 seconds. I find that this gives the HTV a nice glossy finish. Results may vary, of course, but it's just a little trick I like to do from time to time!
Thanks for reading everyone! We really hope you learned a thing or two about heat presses. If you have any questions or comments (maybe a better way to do things?) please leave them in the comments below!
Great instructions. Clear and to the point. Thanks
What temperature and time do I set for shirts
How I purchased
I’m only getting a faded image
I am using a low temp b-paper and A foil finishing paper
Is there a certain paper I should be using or will tia work? I’m not sure what I’m doing wrong
Thank you so much! This was the only post I found that showed me how to use a heat press instead of a review! Now I wish it had come with a temperature list.
Leave a comment