How to Layer Heat Transfer Vinyl without the Thickness

Hey heat transfer vinyl lovers out there! Hope you're all doing GREAT!
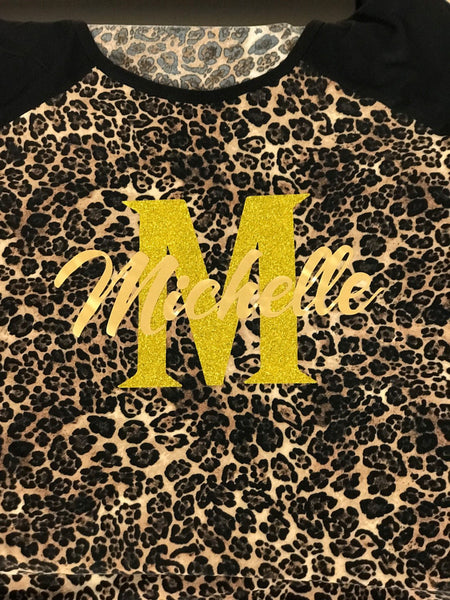
In this tutorial we'll be demonstrating how to layer different pieces of HTV (see the picture above) in a way that doesn't create the kind of thickness that you get when you simply place one layer of vinyl on top of another (though this other technique does have its uses). This method we're showing you is also the one you want to use when your lower layers are glitter vinyl, like in the project we'll be doing today. You can't really layer directly on top of glitter HTV due to its rough surface, so you'll need to follow this method.
Supplies
For this project you'll need:
- Two colors of heat transfer vinyl (preferably Rozzy Crafts! :)
- Design software (e.g. Silhouette Studio, Cricut Design Space, Corel Draw)
- A cutting machine (e.g., Cameo 3, Explore Air 2)
- A weeding tool
- Scissors
- A Teflon sheet
- Home hot iron or a heat press
- Shirt for designing
Creating Your Design
We're going to create a layered first name and first initial design that we'll place on top of a leopard-print Raglan t-shirt using Rozzy Crafts gold glitter for the underlying 'M' and Rozzy Crafts gold standard HTV for the overlying "Michelle".
Big picture, our approach will be to remove the shape of the "Michelle" letters from the design of the "M" so that there will be no gold glitter on the "M" in that space. We can then lay the gold "Michelle" over the "M" and it won't actually be doubling up over the gold glitter vinyl.
You can use this method with any designing software. We'll be using Corel Draw X6 but we'll also tell you the buttons you'll need to press in Silhouette Studio and Cricut Craft Room, so keep reading even if you don't have Corel Draw!
Begin by choosing two different fonts--one that is script style and one that is block style with serifs. We're using “Birch Std” for our bottom layer "M". And we're using “ASSnapper Script” for the word “Michelle”. You might want to play around with your fonts to see which ones you like best (you can find all kinds of free fonts online).
Next, use your software to create your bottom layer letter:

Next, create your top layer letters:

Now drag your two text objects into place so that your first name is over your first initial exactly how you'll want it to appear on the t-shirt. If your name is appearing behind the single letter, simply select your name and choose "Bring to Front" (or a similar sounding option):

Now make a copy of the first name and set that copy off to the side:

Now the time has come to subtract the foreground "Michelle" from the background "M". In Corel Draw you do this by going to Arrange>Shaping>Back Minus Front. In Silhouette Studio you select both objects at once and then go to Object>Modify>Subtract. In Cricut Design Space, you select both objects at once and click "Slice" in the bottom right-hand corner. (You'll then need to drag the image apart to find the piece that you want.)
The next step is to separately cut the copy you made of your first name ("Michelle") and the first initial design you created ("M") that now has portions of it subtracted out. Cut each design using a different color or style heat transfer vinyl. Don't forget to mirror your designs before cutting!
Once you've cut and weeded your designs they should look something like this:

Now you're ready to heat press your design on your shirt! Be sure to follow the temperature and timing instructions that came with your heat transfer vinyl.
QUICK TIP: On full front designs or rear designs, we like to see where the center of the shirt is located. We find this by doing two easy presses on the shirt. First fold the shirt directly in half (shoulder to shoulder), then press for 10 seconds. Then fold the shirt up and down from the arm pits of the shirt to the neck line and press for 10 seconds. Where the two creases cross is the center of the shirt! This also has the added benefit of removing any moisture in the shirt material. See the example below from another project.

Go ahead and press your first-initial layer ("M") and then peel. If you're using Rozzy Crafts HTV, be sure to let it fully cool before peeling!

Now take your top layer, which for us is the gold “Michelle”, and gently lay it over the bottom layer “M” making sure to line it up over the gold glitter where the subtracted area is. Make sure it fits perfectly in the cutout, and feel free to try and try again until you feel it's where you want it.
Once the top design is in place and ready to press, lay the Teflon sheet on top and press it all for the recommended time and temperature. When the time is right (depending on whether it's hot or cold peel), gently remove the carrier sheet.

BOOM, we now have a gorgeous **BLINGED** monogrammed shirt! And it turned out BEAUTIFUL! The colors of the leopard Raglan shirt and the vibrant colors of the Rozzy Crafts glitter and solid gold combined to make this a great shirt!
And that's the end of our tutorial! If you followed along carefully, you should now have an awesome layered-looking design that does not have the unpleasant bulkiness that results when you stack sheets of HTV.
Questions? comments? Leave a note below or email us at contact@rozzycrafts.com
I have been looking for a tutorial for exactly this for awhile now. Thank you!
Leave a comment